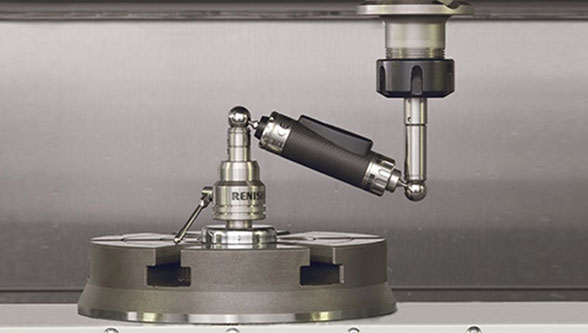
Renishaw ballbars have been dominant in the market for nearly 20 years and that leadership continues today with the QC20-W wireless ballbar system.
What is a Renishaw ballbar test?
The Renishaw QC20-W ballbar system consists of:
- the ballbar itself (essentially a very high accuracy, telescoping linear sensor with precision balls at each end)
- two precision magnetic mounts, one attached to the machine table and the other to the machine spindle or spindle housing.
In use the balls of the sensor are kinematically located in the magnetic cups. This arrangement enables the ballbar to measure minute variations in radius as the machine follows a programmed circular path around the mount on the machine table.
The data collected is sent to a PC, where Renishaw’s software calculates overall measures of positioning accuracy (circularity, circular deviation) in accordance with international standards such as ISO 230-4 and ANSI/ASME B5.54 or in Renishaw’s own analysis reports. This report uses a unique mathematical analysis to diagnose many additional individual machine errors from the set of linear readings. Data is displayed graphically as well as in numeric format to aid and support diagnosis.
Benefits of ballbar testing
Ballbar testing provides a simple, rapid check of a CNC machine tool’s positioning performance to recognised international standards (e.g. ISO, ANSI/ASME etc) allowing users to benchmark and track the performance of their machines and to quickly diagnose problems that may require maintenance and the error sources that produce them.
Regular ballbar testing of machine tools helps to:
- ensure accurate parts, first time, from CNC machines
- reduce machine down-time, scrap and inspection costs
- demonstrate compliance with machine performance and quality management standards
- implement fact based predictive maintenance
The QC20-W system draws on Renishaw’s many years of experience with ballbar testing and offers significant performance and operational benefits:
- Bluetooth wireless technology ensures no wire handling issues, closed door operation and reduced possibility for system damage.
- New hardware and software which allows a ‘partial arc’ (220°) test. This gives you greater test flexibility including
- improved Z axis testing (no custom fixturing required)
- tests where axis travel is limited (typically Z axis on machining centres and X axis on lathes)
- ability to test 3 planes from a single set up, using ‘partial arc’ tests for 2 of the tests and present a ‘volumetric analysis’
- Faster data reading for enhanced analysis on small test circle and high feed rates.
- Enhanced software includes many new features for extended testing and greater ease of use.
![]()


